Monday, June 29, 2015

Mason Jars, Flags, and Sparklers


Mason jars, flags, and sparklers.

I think this combination represents Independence Day proudly.


Add some flowers and an old soda crate and you've got a complete centerpiece.


Every year I get a few boxes of sparklers.
Kids and adults love them!

What is your favorite thing to do with lit sparklers?
I like to spell my name in the air or draw a picture.
Or simply take off running, leaving a sparkler trail as I go ;-).

For extra patriotic flair, I used a blue band on the mason jar.
I found it in my canning supplies.


These frog insert lids made for canning jars do a fantastic job of holding everything upright and in place.


I added some epsom salt for extra stability and a little bling.


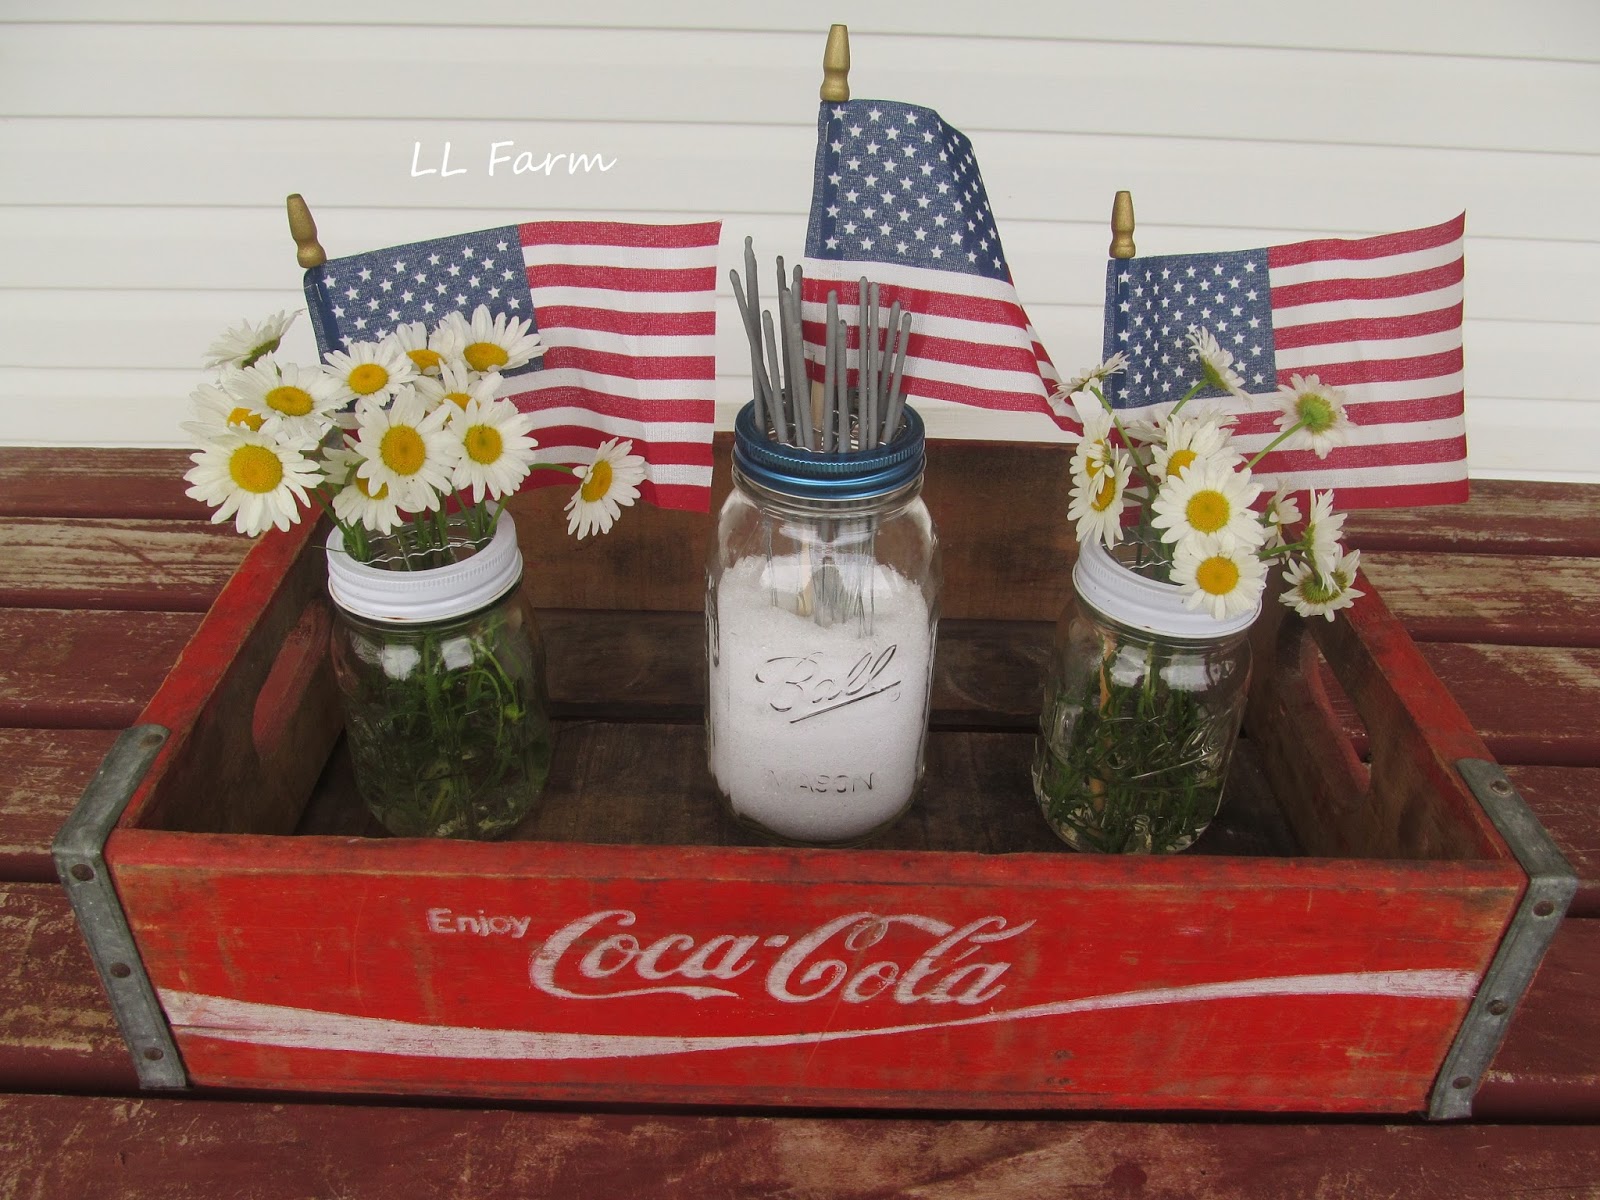
Using smaller mason jars on each side, I added a bouquet of freshly picked daisies.
On these I used white bands from my canning supplies.
(I don't have any red bands, but I bet they make them)

Putting together a display doesn't need to expensive, fancy, or time consuming.

Thursday, June 25, 2015

Re-Purposed Cable Reel


 Look what I found at a yard sale.

It called my name as soon as I saw it.

I love it's character...


gouges...


dents...
flicks of missing paint...

oh, speaking of the paint color...
it is a close match to some other blue pieces that I have in my home.

I asked the lady, 'what is this made from'?

She informed me that it's from an old cable reel.


(like these)

How neat!

Since I didn't actually do this re-purpose, I can only guess how it was done...
Looks like someone took the 'spool' out of the middle and put slats all around, attaching the top and the bottom.

I don't know exactly what I'm going to do with it.


Maybe a plant stand.


Maybe an end table between two chairs.

All I did to this piece was clean it with a damp cloth!
How's that for Trash to Treasure.

And the best part?

It only cost $2!

Yes, two dollars!

I didn't even negotiate ;-)


Maybe I'll see you at a yard sale,

Wednesday, June 24, 2015

Baked Kale Chips


Years ago, kale was known as the curly bright green vegetable that was a garnish for foods and restaurant salad bars.  It is now known as a powerhouse food - full of vitamins!

So many people have told me that they have never eaten kale or if they have that they don't like the bitter raw taste.  I agree that when eaten raw it does have a bitter taste, but when mixed with other garden greens it makes a fabulous tasting salad.

Today I want to share with you a super easy and very delicious way to eat kale.

Kale is something that I always grow in my garden.  You can plant seeds or plants.


This is kale in my garden three weeks after planting the tiny seeds.

When I don't have kale from my garden, I buy it at the grocery store.  You can purchase kale for less than a dollar in the produce section.  They also offer it bagged, rinsed and cut up for a little bit more money.


How to make KALE CHIPS:
rinse the kale
lay flat to dry or use a salad spinner to remove excess water
remove the stems, leaving mostly leaves 


in a larger bowl, add a little olive oil
then add kale and more olive oil
mix with your hands, making sure all the kale gets some olive oil


spread onto a cookie sheet lined with aluminum foil (makes for easy clean up)
sprinkle with salt and pepper
bake at 400 degrees Fahrenheit for 5 - 8 minutes, checking on it near the end


You want it crispy, but not burned.


Also, keep in mind that kale does 'shrink' when cooked.


If you are craving something salty, these are a great healthy alternative to potato chips.
Even Handy Hubby likes kale chips.  Now mind you, he doesn't crave them like I do, but he does like them.

I also substitute kale many times in recipes that call for spinach.
Check out this recipe for Chicken Florentine Pasta with Kale.


Do you have a favorite way to eat kale?

Until next time,
- Lori
  

Thursday, June 18, 2015

Garden Fresh Salad With Garlic Lemon Dressing


It's that time of year!

FRESH garden salads!

I love going into the garden, picking some greens, cleaning them, and making a salad.
Now that's garden to table (smile).

We planted our garden a little late this year, so we are just now getting green onions.
The kale and lettuce should be ready soon.

Until then...
I shall harvest from my parents garden.  They still plant a much larger garden than they need, but it is something that my Dad enjoys.  They always have plenty to share with others!


I gathered lettuce, kale, and spinach from their well manicured garden.
Rinsed it well and stored it in plastic bags in the refrigerator overnight.
I longed for lunch the next day!


To go with the salad, I made a simple Garlic Lemon Dressing:
1/4 cup freshly squeezed lemon juice
1/4 cup extra virgin olive oil
1 garlic clove, minced
a little lemon zest
salt and pepper to taste
Put all ingredients in a small mason jar with an insert lid and band.
Shake well.
Refrigerate leftovers.
The taste is fresh and light...the perfect companion for the leafy salad.


I added cooked chicken and toasted almonds for a complete meal!

What are you gathering from your garden right now?

Monday, June 15, 2015

DIY Vintage Blue Mason Jar Soap Dispenser


Vintage Blue Mason Jars...

the color...

the texture...

the charm...

I have a couple that my Mom gave me and a couple that I picked up at yard sales.

I don't can food in these, but I use them for decorating.


Did you know that you can buy soap/lotion dispenser kits for regular size mason jars?

Well, yes you can!  I didn't know until recently ;-)

I just bought this last week at Hobby Lobby.  

It was only $4.99, but better yet, I had used a 40% off coupon!


My Mom gave me this smaller vintage blue mason jar a while ago.

It's the perfect size for a soap dispenser.


Assembling the dispenser is quick and easy.
Put the pump through the lid.
Thread the fastener to the pump, finger tightening.
Attach the straw to the base of the pump.
Cut straw if needed.
Use with regular size jar bands.
I used a silver banc because the insert is silver.


I love the shade of blue and the character that this adds to my kitchen sink area.

Thank you so much for stopping by!  Have a fabulous week...
                                                                          - Lori

Thursday, June 11, 2015

An Authentic Farm House Sign With Tutorial


I created this GATHER sign from a board taken from my Great Grandparent's falling down farm house.

If you missed the post about their house, you can read it here.


The board is full of character - nail holes, grooves, gouges, and dents. 


This is my way of preserving a piece of my heritage...
through the wood board
and
through the word that I chose to put on it.


I chose the word GATHER because it is a powerful word...
GATHER 'round the table
GATHER with family
GATHER the harvest

The word GATHER
has been and always will be a powerful word!
past - present - future


How I made it:

First, Handy Hubby cut the board down using a miter saw.

Using Microsoft Word, I played around with font styles and sizes until I found one I like and fit on the board.  I ended up using the font Amienne with a 500 font size.


I printed the letters on regular 8 1/2 x 11 pieces of paper.
I spaced between each letter.  The lower case letters printed two per page.


I then cut around each letter and spaced them out on the board, using a tape measure for appropriate placement.  I taped them on top, leaving room for the transfer paper to slide under each letter.


Using transfer paper and a pencil, I traced the outside of the letters onto the board.


Using white craft paint and a small paint brush, I carefully painted in the letters.
I did two coats of paint.

Because the board is old and worn with beautiful grooves and dents, the tracing and painting are not perfect, and that's okay.  It adds to the character.  Farmhouse style is not perfect, right?

I gently placed a hanger on the back of the board. 


The sign is proudly displayed in our eating nook.

A place where we GATHER daily.

Wednesday, June 10, 2015

A piece of my Great Grandparent's house


I made a sign for our eating nook using a board taken from my Great Grandparent's house.

This is what the house looks like today.

But, in its day...

It housed a husband, a wife, and 7 children.
My Grandpa (my Mom's Dad) was one of those children.

Years later, my Mom lived down the holler in another little house...
with her Mom, Dad, and 9 siblings.


She tells stories of spending time at her Grandparent's house.
(She has the BEST memory of anyone I know!)


What it looks like today is what I always remember it looking like.
I have my own childhood memory of storing hay in it.

My children will always have the memory of stopping at it when we are riding our 4-wheelers on the land. 
They also hear stories from me, their Grandma, and their Great Aunts. 


This house (and the stories) are part of our heritage!

Something I want to preserve.


A board taken from the house and made into a sign is my way of doing so.

Click HERE to see how I created the sign, why I chose the word Gather, and where I hung it.

I also took a board from my Grandma and Grandpa's house and Hubby made it into a coat rack.
You can see it HERE.
(It was my very FIRST POST!)

Monday, June 8, 2015

Citrus Lemonade (lemonade stands to New York City)


I just got back from New York City.  I went with my oldest daughter (and a group of high school choir members).

The itinerary was full...
Broadway shows
911 memorial
Rockefeller Center
Central Park
awesome restaurants
shopping
Statue of Liberty cruise with dinner

Time seems to be flashing by as my daughters grow up...


When I made this citrus lemonade, it brought back a memory that put a quick smile on my face (and a tear in my eye)...

When my girls were little, we lived in a subdivision...the perfect place to have a yard sale.

My Mom and I would arrange a yard sale every year.

And the girls would have a lemonade stand.

Sometimes they would spill the lemonade while trying to pour it...

Sometimes they drank more lemonade than they sold...

Any many times people would give them money without even wanting the lemonade...

They would ring it up on their little pretend cash register and put the money inside the drawer.


Citrus Lemonade is very easy to make, yet the addition of oranges kicks up the flavor a few notches!

Make your favorite lemonade
Fresh squeezed is easy and delicious, but most times I use Country Time for convenience

Add lemon and orange slices

Let them get to know each other for a while in the refrigerator 
(at least a couple hours)

Sip slowly and enjoy your every day life!


Sharing with:
Related Posts Plugin for WordPress, Blogger...